Monday, December 28, 2015

How many miniatures can you paint in a year?


What is your yearly miniature painting output? I hope you'll let me know in the comments. For the first time, I've kept track of my own production... in 2015, I painted 161 miniatures:

25 miniatures for 1st/2nd Edition Talisman
18 Orc ships for Man O'War
3 Black Orcs sculpted by Bob Olley
2 Citadel Townsfolk
18 Citadel Gothic Horror Miniatures
22 Citadel Lord of the Rings Miniatures (1980's)
73 Star Wars - Imperial Assault Miniatures

Breaking down these numbers, that's about 3 miniatures a week... not bad, I suppose, given how slowly I paint. I can only guess what the average number of hours I spend on each miniature... but I reckon it has to be at least 4 hours per figure. In other words, I've spent about 644 hours painting this year. Since there's about 6000 waking hours in each year, that means I've devoted over 10% of 2015 to brushwork. Is this a good use of time? Let's ask 17th century mathematician and philosopher Blaise Pascal.
Pascal: "God wants you to paint miniatures."

Pascal is famous for writing that all humans wager with their lives that either God exists or he does not exist. Based on the assumption that there is at least a small probability that God exists, Pascal argued that a rational person should live as though God exists. That's because if God does not exist, such a person suffers only marginal losses (such as genuflection related injuries). But on the other hand, a pious person sets himself up for infinite gains if God does indeed exist. Sounds reasonable! And it seems to me that if God exists, there is also a very small chance that He wants us all to devote at least 10% of our lives to painting vintage miniatures (and will punish us with hellfire if we slack off). The logic is iron-clad. And therefore, my life is on the right track.

The accomplishment that gives me the most satisfaction is finishing the complete set of Talisman miniatures. Sometimes, when other aspects of my life depress me, I try to cheer myself up with the thought "yes things may be terrible, but at least I have painted a complete set of vintage Talisman miniatures." Oddly, this mantra works. 


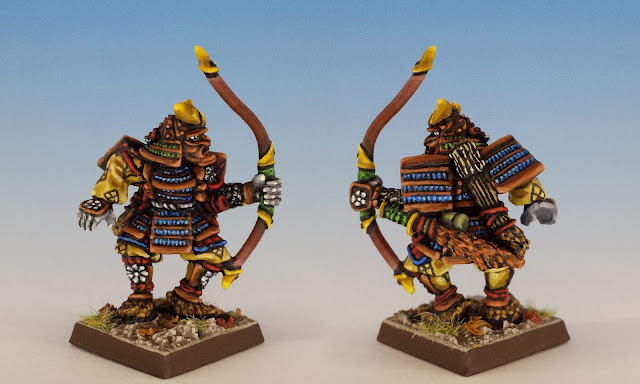
Talisman Samurai, Citadel (1986, sculpted by Aly Morrison)
Talisman Samurai

The most challenging paint-jobs in 2015 have been the Star Wars Imperial Assault. Trying to accurately represent the characters I love so well has been nerve-wracking. The one that took the most effort was R2-D2 -- the geometric patterns of his trunk seem so simple but the details seem to carry so much of his personality.


R2-D2, Imperial Assault FFG (2015, sculpted by B. Maillet)
R2-D2 for Star Wars - Imperial Assault

This has also been my first full year of blogging.  My three favourite posts of 2015 are:


But what has truly brought me pleasure is the wonderful community I've discovered online. I can say with complete sincerity that every follower and (especially) every comment left on this site brightened 2015 for me. And to discover so many other great websites and people has been a revelation... So thanks for visiting, and I hope you have a wonderful New Year!


Tuesday, December 15, 2015

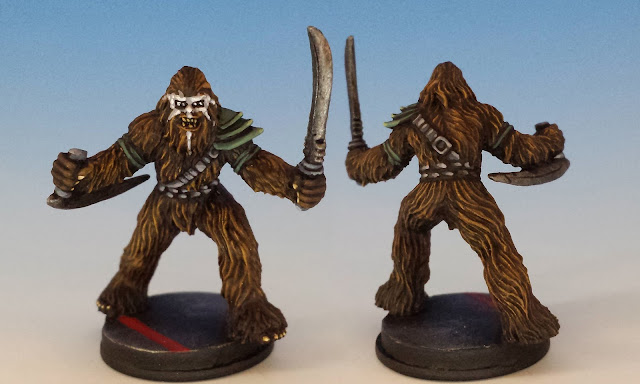
Wild Thing! Wookie Warriors for Imperial Assault


One of the best things about miniature painting (unlike, for example, pediatric surgery) is that you get second chances.


A few weeks ago, I painted the Wookie Warriors for Star Wars Imperial Assault. Instead of dry-brushing, I painstakingly highlighted individual hairs. It took forever, and the end result was bland and oddly reminiscent of a cat turd. To make matters worse, when it came to their big swords, I tried to emulate the past success I enjoyed in using non-metallic metals when painting Imperial Assault firearms. But on such a large blade, my NMM technique collapsed entirely, making the Wookie swords look streaky and artificial.

Time for a mulligan! Wookie Warriors are such a useful unit in the Imperial Assault skirmish game, I splurged on another pack, which I painted up a few days ago. I much happier with the result: a simple dry-brushing of the fur, and more (metallic) dry-brushing on the weapons. Each miniature only took me about an hour to paint, and I'm vastly happier with the results. Sometimes, simpler is better.


Wookie Warriors, FFG (2015, sculpted by B. Maillet)
My original Wookie Warrior: like a cat turd

The most important addition, of course, is the warpaint. I think it makes the Wookies look angry and a little crazy, rather than just hungry (which is what my original Wookies seemed to convey). I love putting warpaint on a miniature - it always requires a certain amount of daring, since one false stroke can ruin the whole face. I just had to plunge in, like a Japanese calligrapher... and hope that I didn't need a mulligan on my mulligan.


Wookie Warriors, FFG (2015, sculpted by B. Maillet)
Simple painting: not at all like pediatric surgery

If you're interested Imperial Assault, I recommend you check out boardwars.eu. Not only do they have the most insightful podcasts and articles about the game, but they are featuring my paint-jobs in their excellent miniature reviews. I'm really honoured.

Thanks for stopping by! I hope you're looking forward to The Force Awakens as much as I am...


Thursday, December 10, 2015

Reading along with the Lord of the Rings: Strider


Strider - Citadel Miniatures 1985

Chapter 10 of The Fellowship of the Ring

In this chapter, the hobbits sheltering at the Prancing Pony get some unexpected help from Strider, a grungy ranger. As Strider enters the story, so does one of the great challenges that faced Tolkien as he wrote the trilogy: Strider is more interesting than Frodo Baggins, the hero of the story.


Indeed, The Lord of the Rings is filled with characters more interesting than Frodo; Strider is just the most striking example. Like all good characters, the ranger is marred by contradictions, the most important being his confidence and self-doubt. My own view is that Tolkien himself was more intrigued by Strider than he ever was by Frodo. This idea hit me when I noticed when Tolkien described these characters. The moment Strider comes into the tale, we're given a sketch of him:
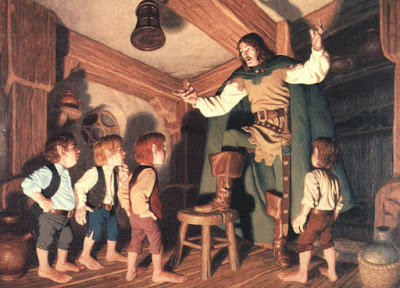
Suddenly Forodo noticed that a strange-looking weather-beaten man sitting in the shadows near the wall... His legs were stretched out before him, showing high boots of supple leather that fitted him well, but had seen much wear and were now caked with mud. A travel-stained cloak of heavy dark-green cloth was drawn close about him, and in spite of the heat of the room he waore a hood that overshadowed his face, but the gleam of his eyes could be seen as he watched the hobbits.
It's a vivid description -- both Frodo and the reader instantly want to know more. But what is truly remarkable is that only later in this sequence, Tolkien offers us his first description of what Frodo looks like. And it is not even a direct description... rather Mr. Barley Butterbur is reporting on Gandalf's instructions on how to identify Frodo:
"...I was given a description that fits you well enough, if I may say so... A stout little fellow with red cheeks," said Mr. Butterbur solemly. Pippin chuckled, but Sam looked indignant. "That won't help you much; it goes for most hobbits, Barley, he says to me... But this one is taller than some and fairer than most, and he has a cleft in his chin: perky chap with a bright eye. Begging your pardon, but he said it, not me."
It's not a particularly vivid description (tall, fair and a cleft chin) but it is still news to me. That is to say, Tolkien waited until Chapter 10 to draw us a picture of Frodo. 


Tolkien's decision to withhold a description of Frodo makes a certain amount of sense. First of all, the story (at least up to this point) has chiefly been told from Frodo's perspective, so his own appearance wouldn't be remarkable to him. Second, Frodo is a bit of a cipher -- a character deliberately cast without strong features so that it's easy for the reader to see him or herself in Frodo's shoes.

But the vagueness of Frodo's character sets up a tension that will run through the course of the book -- Frodo is the center of the story but not the center of attention. Indeed, there's a centrifugal force in the book, that diverts the reader's affections to more peripheral characters with deeper histories, more pungent personalities and greater abilities... characters like Strider, Gandalf, Legolas (or even Sam or Eowyen). The challenge for Tolkien is to keep the story coherent while still allowing these characters to shine.

In my view, this centrifugal tension is one of the things that makes The Lord of the Rings so good, since it adds complexity and texture to the structure of the story, qualities that are often missing from books that keep the focus solely on the main character.  And by diverting our attention from Frodo, Tolkien is able to sometimes surprise us with the depth of the hobbit's character. As Gandalf later says about Frodo, "There is more about you than meets the eye." We'll start stumbling upon some of these surprises as Frodo (and Strider) now start their venture into the wilderness.


To read on, here is my commentary on Chapter 11. Or you can find my commentary on Chapter 9 here.


[Image credit: The Brothers Hildebrandt "At the Prancing Pony" Acrylic on Board (1976).]


Tuesday, November 24, 2015

Oldhammer Battle Report: Orcs vs. Skaven "The Bridge over the River Sty"


"Wot's da plan, boss?"

The question was posed by Captain Gritstool with the indifference peculiar to an orc whose finger is knuckle-deep in his nose. Gritstool's leader, General Krapfang squinted into the sun. He was surrounded by his lieutenants, holding a council or war. "Roight," Krapfang said decisively, "I dunno."

The orcs had taken up a position by a stone bridge over the the Sty River. If they could hold off the oncoming Skaven, a rich season of plunder awaited them in the halfling settlements across the bridge. 
The still summer air was pierced by a cry. A goblin ran into their midst, panting and wailing. "Boss, Boss," he said, "da ratters are comin'!"
Krapfang belched with studied nonchalance. "We knows dat, Smarmy," he replied 
"Burt burt burt Boss. Dey's got giant dogs. With skull faces. And rat ogres. Tails like snakes. Skin dat looks like iron. Huge muscles. Muscles on da muscles. Chaos and shit. We're meat."


Clan Moulder's Chaos Hounds (by 24_Cigarettes)

The orcs started wheezing in fear. Chaos? Monsters? This was not what Krapfang had promised them when he had led them into the valley. They wheeled on their leader, demanding to know what to do. There was a long pause. The General was sweating so hard, it was audible.
Finally, Krapfang cleared his throat. "Wot we needs," he said, "is a resurve."
"A resurve?!"
"Yes," said Krapfang with more confidence, "A resurve. All da top generals keep resurves."
"Wot's a resurve?" the orcs asked. Perhaps it was a kind of potion.
"Da resurve stands back. Way, way back. And when da fightings loudest, and it lurks like we've 'ad it, da resurve charges in, and we win," replied Krapfang, "Simple as peein' down yer leg."
"Well, who's da resurve?"
"Me and my bigguns are da resurve," said Krapfang, "Natch."

Swartbad the Black Orc stiffened. Without further preparation, he horked up a hedgehog of mucus and spat it out on Krapfang's boot. His band of Black Orcs was a recent addition to the army. They were large and terrifying, especially Swartbad. He had a face like a cow's arse halfway through a miscarriage. 

"Dat is to say," said Krapfang thoughtfully, "Me, my bigguns and da Black Orcs are da resurve. Da rest of you get out der and make me proud."
"Well boss, if Swarbad is resurve, my boyz should be resurve too," wheedled Gritstool, "Furs fur."
"Yeah boss," said the old wizard Grogeye, "Da Spell Talker is always in da resurve."
"If der in resurve, you can't reckon us to fight," said Smarmy the goblin.
"REE SWERVE" bellowed the Giant Rotwang.
"Fine! Fine!" cried Krapfang, smelling another mutiny, "We're all da resurve. I already sent da Gobboes across da river for flanky stuff. They'll advance and do da fightin'. We'll resurve from way back 'ere and hope da ratters don't notice us."


Welcome to another battle report, the third in my ongoing feud with 24_Cigarettes and his incredible Skaven horde (the first two battles are here and here). In this 1500 point bash, 24_C assembled a beautiful Clan Moulder army, featuring lots of beastmasters with packs of chaos hounds, rat ogres and giant rats, all of them stippled with terrifying chaos mutations. It was a rich and thematic force. My army was similar to my previous offerings, with the new addition of Bob Olley's Black Orcs.


Krapfang's Backwood Bandits


Krapfang's Tin Kan Kommandoes
14 Orc Bigguns (+1 elites) with light armour, shields, spears + standard bearer and musician
(168 pts)

Lead by General Krapfang Toothshyte, Lvl. 20 Orc hero with light armour and shield
(119 pts)

Wielding the Wreckrune, a magic hell-honed, parasitic sword 
(45 pts)

Gritstool's Nasty Gits
10 Orc Boyz with light armour, shields, spears + standard bearer and musician
(114 pts)

Harboth's Black Mountain Boyz
10 Orc Arrer Boyz with bows, shields + standard bearer and musician
(102 pts)

"A resurve!"
Vape Softbladder's Gobbo Greatmob
19 Gobbos with shields + standard bearer and musician
(63 pts)

Lead by Prince Vape Softbladder, Lvl. 15 Goblin with shield
(41 pts)

Smarmy's Swift Backtrakkers
10 Goblin Stikkas with short bows
(35 pts)

Swartbad's Stompers
10 Black Orcs with light armour and double-handed weapons
(110 pts)

Grogeye's Butt Uglies
3 Trolls
(195 pts)
Da Man-Mangler

Lead by Grogeye the Incontinent, Lvl. 15 Orc wizard
(163 pts)

Da Man-Mangler 
6-man stone thrower with Orc crew
(93 pts)

Rotwang Bawbag the Giant
(250 pts)

Baggage Train
4 orcs & 1 goblin with improvised weapons
(0 pts)

Total = 1498 points


Set Up

Clan Moulder won the dice roll and chose the north side of the map for deployment. They took the field in a tight fist of a formation, with two units of rat ogres and one pack of chaos hounds in the very centre, flanked on either side by skavenslaves. A powerful Clan Moulder warlord wielding a magic sword accompanied one of the groups of rat ogres (denoted on the map by an asterisk). The force was rounded out with a huge swarm of giant rats. Most of the units had chaos mutations, but the chaos hounds were especially worrisome with a fearsome appearance that gave them fear +2


The orc set-up was very different. Krapfang dispersed his forces widely in an effort to keep them from breaking out into animosity inspired brawls. He was especially eager to keep anyone from interfering with the crew of his stone-thrower, The Man-Mangler. 

The Orcs prepare to hold the bridge over the River Sty


Turn 1: The Better Part of Valour


Like Fabius Cunctator, General Krapfang's strategy was animated by one idea: avoid battle for as long as possible. Time would allow his superior missile troops to whittle down the enemy, and may even permit some sort of daring flank attack. So on the first turn he sent his light troops scurrying forward on the left and right, while his centre remained motionless. Although Harboth's Arrer Boyz landed a few arrows among the giant rats, the crew of the Man Mangler showed typical orc competence and lobbed their stone well short of the chaos hounds. 

The decrepit orc wizard, Grogeye, cast "Cause Frenzy" on the unit of trolls that he himself was leading, with the intention that if the chaos hounds did get close, the trolls would try to fight with them (or at least vomit on them). This simple spell would have a dramatic impact on the outcome of the game.


Would you hasten to fight this army?


Clan Moulder had no wizard, and their only missile weapons were two Warpfire Throwers embedded in the units of Skavenslaves. So their turn simply consisted of charging forward and chittering in a most unseemly manner.

The Trolls consider hiding under the bridge, as their ancestors used to do


Turn 2: Destructive Even in Error


In the second turn, Krapfang continued to hold back his main strength. His flanking forces advanced, but their arrows were ineffectual against the battle-hardened Skaven. His hopes rested more and more on the Man-Mangler. However, the crew once again forgot to carry the three when calculating their trajectory, and missed. And yet, a weapon like a six-person stone thrower is so destructive that it hurts even when it misses -- in this case, the errant stone grazed a couple Skaven units, wiping out two Rat Ogres and one Chaos Hound.

This was not enough to stop Clan Moulder. In an effort to delay the pain, Grogeye cast Windblast at the Skaven General and his unit of Rat Ogres. 

On the right flank, Goblin skirmishers snipe from cover at the Skaven

The magical wall of wind indeed halted the Skaven General, but he sent the rest of his units ahead. In a worrying development, the seething mass of giant rats forded the River and moved to intercept the flanking force of Goblins.

On the left flank, the swarm of Giant Rats crosses the river, scaring the sheep


Turn 3: Gotterdammerung!

This was such an action-packed turn, I've broken it into two maps, one for the Orc's turn and one for the Skaven's.


The moment of truth had come for Krapfang. Any hope of dismantling Clan Moulder before they arrived had vanished. It was time to charge or be charged. Or at least it was time to order someone else to charge... which meant sending in "da uglies" - three trolls and a giant.

With surprising good fortune, the trolls passed their stupidity check and fear check and charged the Chaos Hounds. Bewitched by Grogeye's spell, they also entered a battle frenzy. Next to them, Rotwang the Giant charged the oncoming Skavenslaves. Meanwhile, on the far left flank, Goblins and Orc archers charged into the swarm of giant rats, hoping to panic them with a pincer movement.


Goblins and Orc Archers attempt to surround a seething horde of Giant Rats

But before any of these melees could resolve, there was some missile fire. The Goblin Archers fired at the melee between the Giant and the Skavenslaves, confident that their tiny arrows couldn't hurt Rotwang no matter how often they hit him. Actually, they hit him quite a lot. Indeed, it was their finest hour. Although none of their enemies were injured in the barrage, the Goblins dealt the Giant 2 wounds -- forcing him to make (and pass!) a morale check. 

On the upside, the Man-Mangler finally landed on target, transforming 3 rat ogres and 2 handlers into strawberry jam.


The Trolls charge into the Chaos Hounds, while the Giant sends his opponents fleeing away

All eyes were on the combat between the Trolls and Hounds. With astounding dice rolls, err, skill, the Chaos Hounds savaged the clumsy Trolls, dealing 5 wounds -- almost enough to kill 2 Trolls and more than sufficient to rout the unit -- except that Trolls were in a frenzy and would never retreat. To add to insult to injury, the Trolls made their regeneration roll, suddenly erasing all the damage that the Skaven had done.

Although Rotwang had a few arrows lodged in his buttocks, this didn't stop him from eating a few Skavenslaves. Unsurprisingly, the surviving slaves decided they had better things to do and took off for the nearest sewer.


The battle hung in the balance. Clan Moulder decided to shatter the orcs in one all-out assault. The Skaven General and his Rat Ogres muscled their way through Rotwang's Windblast and swung into the side of the Trolls. The General smote one Troll with his enchanted sword, hideously sucking the life out of him. Meanwhile his Rat Ogres and Chaos Hounds devoured a second Troll. Following up on this coup de grace, the General moved next to Grogeye himself, ready to execute the wizard as he cowered behind the last Troll.


The charge of the Skaven general and his Rat Ogres

Meanwhile, the sole surviving Rat Ogre from the other unit charged down the line and crashed into the Black Orcs. And on the western side of the river, the Giant Rats were locked in an existential struggle with the Krapfang's flanking force -- with the rats scoring many wounds, but the orcs miraculously fending them off with their flimsy shields.  To add to the violence, the remaining unit of Skavenslaves belched out a blast from the Warpfire Thrower, melting 5 unsuspecting Goblins.

The Orc Army was thrown to the edge of defeat. But the Goblins stayed calm, despite the gouts of liquid fire coming at their rear. The Black Orcs fought the raging Rat Ogre to a stalemate, thus avoiding an automatic rout. The Trolls again regenerated from the dead, and due to their frenzy, refused to break before the terrifying Chaos Hounds. Apparently, there is a fund of luck that the gods reserve for cowards like Krapfang.


Turn 4: A Stab in the Back


If there is one thing that Krapfang knows, it's how to slip it into your ribs when your back is turned.

In the previous turn, the Skaven General had advanced almost behind the Trolls in an effort to get at Grogeye. So now, the Skaven leader was facing north, away from Krapfang and his 15 well-armoured Orc Elites. Now was the time to call in the reserves!


Krapfang's Bigguns charge into the confused mass of Rat Ogres, Chaos Hounds, Giants and Trolls

As the Giant wheeled into the side of the Chaos Hounds, and the Black Orcs fought back against the Rat Ogre, Krapfang jumped into action, charging the Skaven leader from behind. The Skaven rolled a panic check to resist this unexpected backstab... anything under a 10 on two dice would make it... and up came an 11. Just like that, the General and his Rat Ogres panicked and routed from the field, initiating a dreadful chain reaction of panic checks for all the other Skaven. At that moment, we called the game. 


Reflections

Napoleon once said that when the decisive moment comes "the smallest body of reserves accomplishes victory". Well, that may be true... but Napoleon never had to reckon on Rat Ogres.


This whole battle ran along a knife's edge. Both sides had to roll so many panic, fear and rout checks, arising from Giants, Chaos Hounds, flank attacks and suchlike... It's a wonder that neither side broke before the 4th round.

For my part, I was astounded at the power of chaos mutations (this being the first time I've ever encountered them): fearful visage, iron skin, snake tails... all of these transformed the Skaven into wicked adversaries (at no extra points cost). For 24_Cigarette's part, I think he was impressed once again at the devastating combination of a Giant and a Man-Mangler. (Indeed, the only thing that could hurt my Giant was my own 30 point unit of Goblin Archers.) Well, that's the nature of Oldhammer! It's not about game balance, or points, or even strategy. It's about a great opponent, beautifully painted lead and a lot of beer.

Saturday, November 14, 2015

Bounty Hunters vs. Stormtroopers -- A Battle Report


My friend Nicos and I sat down last night for our first skirmish game of Star Wars Imperial Assault since the release of Twin Shadows. I've often played with Nicos in the past (Darth Vader) using the most deadly force (Darth Vader) that the rules would allow me (Darth Vader). But this time, we were aiming for a more thematic and less competitive session. I opted to play the Mercenary Faction, with a special emphasis on classic Bounty Hunters, while Nicos tried out an Imperial force entirely composed of Stormtroopers. 

The result was the most exciting game of Imperial Assault that I've played.


Matthew's Army: BOUNTY HUNTERS APLENTY

Boba Fett
IG-88
Trandoshan Hunters
Hired Guns x2

Command Cards: Overdrive, Mandalorian Tactics, Blaze of Glory, Emergency Aid, Dirty Tricks, Price on Their Heads, Capture the Weary, Focus, Element of Surprise, Take Initiative, Rally, Recovery, Celebration, Hard to Hit, Urgency.

Strategy: Throw the Hired Guns into the fray in order to draw attention away from the more valuable figures. Focus Boba Fett's and IG-88's withering fire on key opponents and kill them from a distance. Pray that mobility compensates for the bounty hunters' lack of staying power.


Nicos' Army: STORMTROOPERS! STORMTROOPERS! STORMTROOPERS!

Kayn Somos
Elite Heavy Stormtroopers x2
Stormtroopers x2
Vader's Finest (attached to one unit of Elite Heavy Stormtroopers)

Command Cards: Celebration, Covering Fire, Expose Weakness, Fleet Footed, Grenadier, Planning, Rally, Recovery, Reinforcements, Reinforcements, Strength in Numbers, Take Initiative, Rally the Troops, Rank and File, Of No Importance

Strategy: Strength in numbers. The beauty of this build is that every single figure possesses the "trooper" trait, amplifying the power of such Command Cards as Covering Fire, Strength in Numbers, Rally the Troops and Rank and File. This fact also gives Kayn Somos wide scope for his special ability "Firing Squad". 


The Scenario: UNKNOWN TREASURES (from the Hired Guns villain pack)

Deep in the Sewers of Nar Shaddaa, the lagoon of mystery contains a variety of "unknown treasures". These treasures (denoted by the "A" symbol on the map) can be used to heal a figure, give it focus or add movement points. Two of the eight treasures give the player retrieving them 4 victory points.

This is an atypical set up. Most Imperial Assault scenarios require the players to seize and hold certain objectives in order to obtain decisive quantities of victory points. This leads to short and "objective oriented" games, where points are more important than carnage. But in this game, there are only 8 points worth of objectives on the table -- so victory can only really come from destroying the opposing army.


The map itself consists of a large central chamber flooded with water -- this chamber is surrounded on all sides with dank hallways and galleries. The Bounty Hunters won initiative and started in the blue zone, and the Stormtroopers deployed in the red zone in the south-west corner.


TURN 1: Hit and run

From the outset, it was clear that the massed fire of the Stormtroopers would reduce the Bounty Hunters to charcoal if they tried to meet the Imperials head-on. So the Bounty Hunters adopted guerrilla tactics. In the first turn, as the Empire boldly advanced in lock-step formation, the Mercenaries fanned out along the galleries, sniping from the shadows and dodging back into cover. 


Heavy Stormtroopers from Red Squad move into the central chamber 

One unit of elite Heavy Stormtroopers ("Red Squad") charged up the gantry in the central chamber, with several regulars troopers and Kayn Somos behind them. One intrepid trooper even plunged into muck and shot a Hired Gun, but was himself killed by the Hired Gun's "parting shot". 

The Empire also sent a probing force up the western-most hallway ("Blue Squad"). Boba Fett nailed the lead Stormtrooper and then ducked to avoid the Heavy Stormtroopers lumbering after him.  

The turn ended with the Empire dominating the strategically vital main chamber and its all-important computer terminals. 


Turn 2: The might of the Empire

The Empire now had the initiative, and compounded their advantage by playing the Covering Fire card, which gave all troopers (i.e. each and every figure) the stun ability. The Imperials also used the Reinforcement card to replace one of their fallen soldiers. Everywhere one looked, there was ghastly white armour.


IG-88 holds off the Imperials as Hired Gunds drop like flies all around him

With their superior firepower, the Stormtroopers were able to vapourize two more Hired Guns near the main chamber. The more important Bounty Hunters did their best to retreat, waiting for the Covering Fire card to expire. The only exception was IG-88, who managed to injure one of the Red Heavy Stormtoopers wading northwards through the water. However, this wasn't really enough: with Kayn Somos behind them, the Heavy Troopers now occupied the very centre of the board, giving them a deadly vantage on the mercenaries.


Turn 3: Death in the sewers

This was a very bloody turn. Things began on a sour note for the Bounty Hunters, as the Empire played the Seize Initiative card, pressing the Bounty Hunters before they could withdraw to safety. Two Blue Heavy Stormtroopers charged into close quarters, trying to gun down Boba Fett and a Trandoshan Hunter has they crouched in an angle of the north-west hallway. Luckily, the attack went awry, leaving Fett unharmed. 


IG-88 used the Overdrive Card to enter into a shooting frenzy. Seizing a window of opportunity, he fired a series of blasts at Kayn Somos in the centre of the main chamber, wounding but not killing the Stormtrooper Commander. Kayn charged north with the Red Squad and invoked his Firing Squad ability. The ensuing firestorm killed two Trandoshans and nearly fried IG-88.

However, the death of the Trandoshans was a mixed blessing. With them out of the way, Boba Fett had a clear line of sight to Kayn Somos. Laying down the Mandalorian Tactics card, he smoked the Stormtrooper Commander with a headshot. Finally, the Bounty Hunters were doing what they do best -- taking down high-value targets. A Celebration command card punctuated this small victory.


Turn 4: Don't fear the reaper

The game hung in the balance -- both sides were bloodied. Boba Fett started the turn by maiming another Heavy Stormtrooper and then moving to screen the battered IG-88, who was hiding behind a wall. However, the remaining Heavy Stormtroopers formed into a solid block and advanced quicker than anyone had anticipated, thanks to a Rank & File card. This humble command card seemed to turn the fortunes of the game, because it allowed the troopers to see and shoot IG-88, who exploded under a salvo of blaster bolts. Playing their own Celebration Card, the Empire now had a strong lead in victory points, 35 to 28.


Stormtroopers mass to take down IG-88

When the dust settled, two regular Stormtroopers and 2 Elite Heavy Stormtroopers faced off against Boba Fett and a single Hired Gun. And even this Rodian thug didn't last long... at the end of a turn, he was shot in the face by a trooper -- but his parting shot managed to kill his killer, helping to even the odds for Fett.


Turns 5 to 8: Boba Fett contra mundum

Now Boba Fett faced off against 2 Heavy Elite Stormtroopers and 1 regular trooper. At first, these odds seemed even (Boba Fett's 12 Health versus a combined total of 18 for the Empire). But Fett is a true killer.


Boba Fett is a hunter of men

Using his superhuman mobility, Fett played a cat-and-mouse game with the Imperials, shooting and then rocketing away to some dark corner of the sewers. Although the Elite Heavies boasted deadly firepower, they could not catch up to the Mandalorian. It took a few turns, but with a grinding inevitability, Fett bewildered them, then wounded them, then killed them.

Final tally... Bounty Hunters: 40 points, Empire: 35. A very close game.


Reflections

Although both forces were grand to play, they were remarkably unsuited to fighting each other. Bounty Hunters excel at killing heroes and leaders not cleaving solid masses of troops. On the other hand, the Elite Stormtroopers are best when using their own "blast" ability against concentrated forces, rather than trying to pick off isolated figures in a long-distance firefight.

There was a lot to enjoy in the game. I was again impressed by how the cards and rules of Imperial Assault brought out the flavour of Star Wars. The bounty hunters are lone wolves; they're deadly but they don't really assist each other or complement each other's abilities. The Stormtroopers have menacing firepower, but are encumbered by their armour and restricted by their need to stay in formation. And in the end, of course, it was nice to see that Boba Fett really is a stone-cold badass. The best part of the evening, however, was the clash of strategies: the hit-and-run guerrilla warfare of Bounty Hunters Aplenty, versus the disciplined squad tactics of Stormtroopers! Stormtroopers! Stormtroopers! 

Who says that you need a bunch of rebels to make Star Wars fun.