Sunday, June 5, 2016

Painted Star Wars Miniatures - The Bespin Gambit


Behold painted miniatures of Lando Calrissian, Bossk, Agent Blaise and the ISB Infiltrators. They come from the Ally and Villain packs that were released in conjunction with The Bespin Gambit, the latest expansion for Star Wars Imperial Assault.


"You look absolutely beautiful."
Props to Gary Storkamp, the sculptor of Lando Calrissian. Rather than modernizing Lando, he's preserved several key features of Billy Dean William's character that are thoroughly dated to the 1980's: his high waist, his pirate shirt, and especially his magnificent Jheri Curls. 

But when it came to painting Lando, I had my own challenges. One was to capture the baby blue of his blouse, or the soft caramel of his skin tone. But the most important element of Calrissian's appearance is the lining of his cape. This gold/green paisley is what gives Lando his flare and style. Without capturing the lining, this miniature would be a nullity. So I worked hard to create the impression, if not the replica, of this complex pattern.


Lando Calrissian, FFG Imperial Assault (sculpted by G. Storkamp, 2016)


The sculptors of Imperial Assault have been methodically ticking off all the staple poses of the villain. We have the Evil Pointing, the Sinister Hand Clasp, and the Karate Chop. Thankfully, we now have Agent Blaise with a classic Fist Shake. Nothing says, "I'll get you one day, you stupid heroes!" more eloquently than vibrating your fist in the air. And we know that Agent Blaise is an old pro, because he knows to take off his helmet before trying this maneuver. How else will the Rebels know that you're grimacing?


Agent Blaise, FFG Imperial Assault (sculpted by D. Ferreira, 2016)


I've given Agent Blaise a little grey at the temples. I'm pretty sure that only an age-addled person would opt for a fist shake, rather than using the large sniper rifle he's holding in his other hand.


ISB Infiltrators

Thankfully, Old Man Blaise is accompanied by the ISB Infiltrators. Since the ISB (Imperial Security Bureau) is the Gestapo of the Empire, I tried to make these troopers as Aryan as possible. But it was not clear from Fantasy Flight Game's card art whether these miniatures are supposed to be wearing actual purple armour, or whether they're in the standard whites of the Stormtrooper that's been artistically tinted by dim light. I decided to go for a purple-blue armour -- it seems better suited to their covert operations -- and marks them out as special badasses.

ISB Infiltrators, FFG Imperial Assault (sculpted by D. Ferreira, 2016)


But because I like hedging my bets, I couldn't help myself from kit-bashing some ISB variants. Using Scout Trooper heads and backpacks from some old WotC miniatures, I created a couple elite Infiltrators with traditional white armour and helmets. They're in perfect camouflage for a commando raid on a chessboard or zebra sanctuary!

These scouts join some of my other conversions, like the Mon Calamari Saboteurs, the Aqualish Hired Guns and the Gran Rebel Smuggler.


ISB Infiltrators (conversion), FFG Imperial Assault (sculpted by D. Ferreira, 2016)


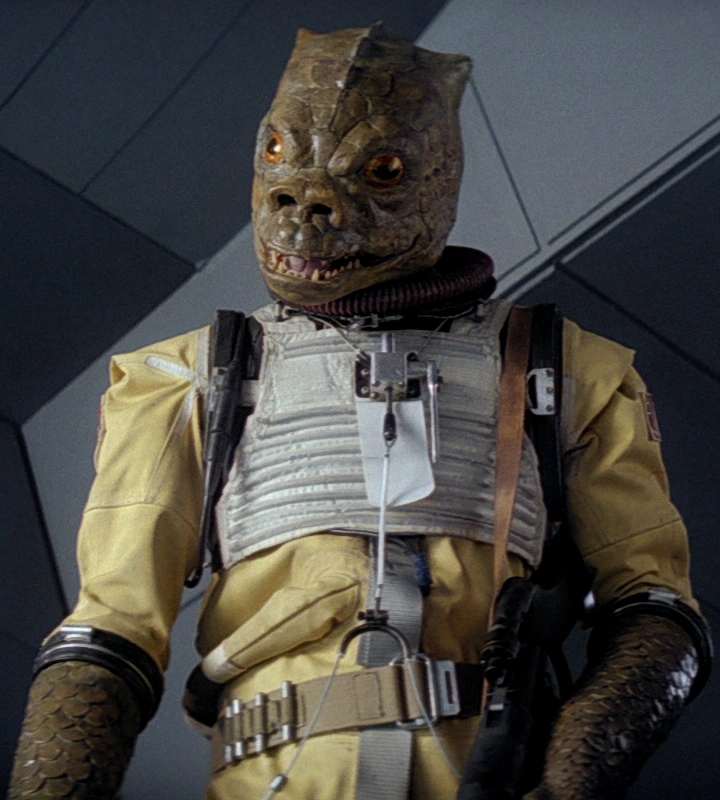
Finally, there's Bossk. I loved painting this cold-blooded bounty hunter. His palate (yellow, yellow-green and white) is as simple as a flag but completely arresting. He's a perfect encapsulation of the Star Wars aesthetic: simplicity and strangeness in equal parts. But the thing that gives me most pleasure is that sculptor Gary Storkamp resisted the temptation to make Bossk look like he's growling. Instead, he's maintained the disquieting reptilian smile that marked out Bossk during his cameo in The Empire Strikes Back.


Bossk, FFG Imperial Assault (sculpted by G. Storkamp, 2016)


Stay tuned for pictures of the rest of the miniatures from The Bespin Gambit in the next few days! And if you've painted any of these miniatures, please let me know in the comments.


Wednesday, June 1, 2016

Painted Scenery for Star Wars Imperial Assault


I've just painted over 100 pieces of scenery for Star Wars Imperial Assault. And I'm tired. CombatZone Scenery, a company in the UK, produces a beautiful line of terrain tailored for the game. Rendered in heavy casting plaster, the pieces reproduce the 2-dimensional features printed on the map-tiles, as well as other items like control consoles and supply crates.


Terrain is central to achieving an authentic Star Wars feel...  what is Tatooine without the lonely moisture vaporators, or a Rebel base without glowing tactical screens?  So I'm happy that there's a way of bringing these places to life in 3 dimensions. The only problem is the cost in money and time. Buying and shipping all this terrain cost me almost $250 Canadian -- and then it was about 7 weeks of intense painting. That's a long time to spend painting crates and snowbanks.

But, in the end, it's worth it. One of my recurring themes is that Imperial Assault is a game that straddles a borderland between board games and proper war-games. A key difference between these two categories is a board game is ready to play out of the box, but a war-game only becomes playable after a long labour of love: collecting the miniatures, imagining the armies, customizing the models, assembling the terrain, planning, painting and presenting.


I've always wanted a proper Star Wars war-game -- one with broad horizons for the hobbyist in me. I suppose Fantasy Flight Games made their game a little bit too structured and a little bit too easy for my tastes. Well, screw them. I'll keep on finding new ways to make Imperial Assault costly and time-consuming.


Thanks for looking. And don't forget: if you like Imperial Assault, I have galleries of the complete painted miniatures for the Rebels, Imperials and Mercenaries.


Wednesday, May 25, 2016

Imperial Assault Battle Report: a Bantha Too Far


In our last skirmish for Star Wars Imperial Assault, my friend Nicos and I were amazed by the destructive power of the Bantha Rider (RIP Princess Leia).  But was it unbeatable? We set up another game to find out. Instead of our usual goofy and thematic games, we took the gloves off and decided we'd try to make our armies as deadly as possible. 

All we needed was the right scenario...


And so the scenario we drew was "The Art of Robotics" from the Wookiee Warriors Ally Pack. Which side would triumph by exploiting secret cybernetic technology?

The map contained two Droid Prototypes (signified in our game by two Assassin Droids). At the end of each turn, controlling one of these Prototypes was worth a whopping 8 points. And, a player who controlled a Terminal would be able to move each Prototype up to 4 spaces. In other words, this was a scenario where control and position would generate a lot of Victory Points.


Development Facility (courtesy of Ibsh)

The Mercenaries set up in the blue zone, and the Rebels in the red. We were separated in the Northwest Corner by only a couple doors, but to the Southeast lay the valuable Droid Prototypes -- who could get there first? 


The Mercenary Force: Banthakrieg!

Deployment Cards: Bantha Riders x2; Beast Tamer (attached to one Bantha); Boba Fett; Nexu; and Hired Guns.

Command Cards: Celebration, Crush, Element of Surprise, Ferocity, Jundland Terror x2, Mandalorian Tactics, Opportunistic, Rally, Roar, Set a Trap, Size Advantage; Survival Instincts; Take Initiative, and Urgency.


"I will have my army of unstoppable Bantha Cyborgs!"

Strategy: The two deadliest resources available to a Mercenary player are Boba Fett and the Bantha Riders. So why not combine them? After all, they are oddly compatible. Both are alarmingly fast, rushing far head most other units. But they're also durable and damaging. My strategy was to soften up my opponent's toughest units with the charging Banthas. Then Boba (and the Nexu) could swoop in and prey upon the most wounded. It would be a blitzkrieg, but with water-buffaloes instead of tanks.


The Rebel Force: Gaarkhan and his Wooks


Deployment Cards: Gaarkhan, Wookiee Warriors x4.


Command Cards: Adrenaline, Counter Attack, Cripple, 
Furious Charge, Hard to Hit, Pummel x2, Rally, Recovery, Roar, Self-Defense, Take Cover, Urgency, Wookiee Rage x2.


So much Wookiee in such a small space.

Strategy: General Patton said "A good plan, violently executed now, is better than a perfect plan next week." With 9 rampaging Wookiees, the Rebel plan was all about violent execution. The Wookiees would charge hard and mince up anything that got in their way. However, to avoid having his Wookiees crushed en masse by the Banthas, Nicos tried to space out their attack, spreading his warriors out and dividing my own forces.

I honestly don't know how -- in a straight up fight -- anything in Imperial Assault can stand up to an army like this one. It's a matter of arithmetic. These 9 Wookiees have a combined health of 98. They can roll up to 18 attack dice on any given turn, including 9 of the deadly red dice. 

By way of comparison, my force has a total of 65 health -- which is normally quite good -- and rolls 13 attack dice.

However, one of the great things about Imperial Assault is that it's not a simple slugfest, as this mission will show...


Turn 1: First Blood


Hired Guns always get the worst jobs. In this case, they were given the task of seizing and holding the central Terminal in the face of the onrushing Wookiees. No probs.


What could possibly go wrong? By the way, have you heard from Greedo lately?

The Rebels were not far behind. While Boba Fett wounded a Wookiee Warrior with a long-distance shot, Gaarkhan used his Charge ability to rush the nearest Hired Gun and decapitate him. 


"Why do I keep taking these shit jobs?"

In the northwest corner, both the Wookies and the green Bantha Rider hesitated about attacking each other, thus leaving one Terminal unclaimed. But the Terminal in the centre of the board was possessed by Gaarkhan. Was possessed... until the red Bantha came barreling down the hall, shoving Gaarkhan out of the way and taking the Terminal. This allowed the Mercenaries to move and control one of the Droid Prototypes, generating an early lead.

Mercenaries: 8 points.
Rebels: 0 points.


Turn 2: The Fur Flies

In the Northwest corner, some Wookiee Warriors attempted to take control of a Terminal -- but the green Bantha, emulating his red companion, simply pushed the Wookiees out of the way and sat on the Terminal, preventing any Rebel from accessing it.  Meanwhile, the red Bantha rammed into Gaarkhan and his companions, killing Gaarkhan in a bloody stampede.


I love the smell of Bantha in the morning

But even as the red Bantha charged, a pack of Wookiees were slashing and stabbing at it. Ultimately, their furious attack took its toll and the great beast listed, groaned and fell, like a battleship heaving to the bottom of the ocean.


However, by occupying the bulk of the Wookiees, the Banthas allowed the Mercenaries to retain control of both Terminals and one Droid Prototype, garnering another 8 points for Boba Fett.

Mercenaries: 24 points
Rebels: 10 points


Turn 3: Red in Tooth and Claw

Although the Mercenaries had a commanding lead in the points, they were now grievously out-numbered in the centre of the board. One Prototype Droid was in Rebel hands and would be impossible to dislodge. To make matters worse, in the northeast corner, three Wookiee Warriors were finally able to bring down their big game prize. 


Aren't Banthas an endangered species?

The Mercenaries had only 3 models left: Fett, the Nexu and one Hired Gun. Reluctantly, Fett abandoned the idea of killing the swarming Wookiees and concentrated instead on controlling the one remaining Prototype Droid that was still in play. By barricading himself in a corner with the Nexu, the Rebels had no way of getting it. It was now a race to 40 points.


Guarded by the Nexu, Boba Fett  plunders the Prototype Droid


Mercenaries: 32 points
Rebels: 27 points


Turn 4: So Close and So Far...

Now the climax. The mass of Wookiees dominated the Terminals and could count on getting control of both Prototypes at the end of the round. Nevertheless, if the Mercenaries could earn 8 points by killing one or maybe two Wookiees, they would instantly win the game. Everything was coming down to one desperate push. 

Suddenly, the Rebels changed the entire complexion of the game by playing the Adrenaline command card, giving each Wookiee 5 additional health for the entire turn. Now killing these hairy bastards would be nearly impossible during this, the last turn of the game.


The Final Messy Melee
Undaunted, Boba Fett pounced on one Wookiee, slaying him with such extreme prejudice that not even Adrenaline could save him. Meanwhile, the last Hired Gun was killed, but not before mortally wounding another Wookiee. Although this Parting Shot wasn't enough to overcome the Adrenaline, it would give the Mercenaries a victory at the beginning of the next turn (when the Adrenaline wore off). In other words, the Mercenaries had triumphed, unless the Rebels could somehow win the game first.

And there was only one way to do this: the Wookiees must kill the Nexu. An not just any Nexu. An unharmed, nay, even frisky Nexu. And against the odds, that's exactly what they did. With a couple of powerful slashes, two Wookies Warriors slew the Nexu. Along with control of a Prototype, that was enough for a stunning, come-from-behind Rebel triumph.

Mercenaries: 32 points
Rebels: 45 points


Reflections


This was, hands down, the best game of Imperial Assault that I've played. Up until the last turn, it was unclear who would win, or how it would happen. More importantly, the pack of Wookiees baiting and bleeding their huge prey is an image I'll savour for many weeks.

What surprised me most was how close the Wookies came to losing the game. Although they were (by far) militarily superior to the Mercenaries, strength is not enough in Imperial Assault. Control of objectives and Terminals is vital -- and the Banthas's ability to (literally) sit on a Terminal, denying all other figures any access to it, is a potent strategic tool. 


Equally impressive was Boba Fett. He is so fast and so defensive, Nicos made the painful strategic decision to simply leave him alone -- it was too costly to try to kill him. Ultimately, I think this masterful act of restraint was what won the Rebels the game. And indeed, Fett was completely unharmed by the end. Well, that's all to the good. He'll take this defeat in stride. He won't make the same mistake again. He won't go... a Bantha too far.


Friday, May 20, 2016

Imperial Assault Battle Report: The Bantha Strikes Back

What happens when you release two rabid Banthas into a tiny space-space station? This question, and so many more, are answered in this week's post.


Yes, its time for another battle report for Imperial Assault. I sat down with my friend Nicos to fight out the "Incoming Transmission" scenario, and (more importantly) to see how the new Bantha Rider models perform in a skirmish game.
Your slicers have discovered a small space station whose comm systems receive secret communications from the Kuat Drive Yards. As you approach the space station, an enemy shuttle appears on your scopes. You fire on each other, but you both prove evasive. Sensors indicate the enemy shuttle's carrying whale-sized life signs. WTF? You board the station and prepare to fight...
The map was the Kuat Space Station. My army of Bantha-heavy mercenaries began the action in the blue docking bay. Nicos' force, entirely consisting of Rebel spies, started in the red zone. Each turn, the three relay stations (marked with X's on the map) accrue more victory points -- a player who controls a relay station can activate it in order to collect these points and discard the station.


Kuat Station (courtesy of Ibsh)


The set-up contained no surprises. Both sides divided their teams in 2 parts -- with one half aimed at the Northwest relay station, where the armies were separated from each other by a pair of blast doors. The second half of each army was poised to pour into the rest of space station. The Mercenaries had the first move.


The Mercenary Force: The Bantha Extravagantha

Deployment Cards: Bantha Riders x2; Beast Tamer x2 (attached to each Bantha); Tuskan Raider x2; Nexu; Hired Guns; and Punishing Strike.

Command Cards: Jundland Terror x2, Size Advantage; Survival Instincts; Crush; Ferocity; Roar; Close the Gap; Single Purpose; Celebration; Element of Surprise; Opportunistic; Rally; Take Initiative; and Urgency.


Wildlife crowds the Mercenary's docking bay

Strategy: I'm not sure I can dignify my approach with the term "strategy". I would rush my opponents with the Bantha and use stampede and trample to mash them into pudding. To assist this, I could exploit the many command cards that enhance creatures (and especially Bantha Riders). Finally, my Tuskan Raiders would throw their Gaffi Sticks around, applying weaken or (with the help of Punishing Strike) stun.

(N.B. I realize now that I should have only had one Beast Tamer , since it is a unique Deployment Card. Oops. Thankfully, my easy-going opponent didn't protest. In any event, the 2nd Beast Tamer was not in much use.)


The Rebel Force: I Spy You

Deployment Cards: Leia Organa; Combat Suit (attached to Leia); Verena Talos; Loku Kanoloa; Mak Eshka'rey; C-3PO; Rebel Saboteur x2; Targetting Computer x2 (attached to each Rebel Saboteur); and Rebel High Command.

Command Cards: Hide in Plain Sight; Master Operative; Heart of Freedom; Slippery Target; Stealth Tactics; Recovery; Coordinated Attack; Hit and Run; Self Defense; Deadeye; Element of Surprise; Hard to Hit; Take Cover; and Urgency.


Princess Leia prepares to lead from the Rebel's centre

Strategy: Despite it's strong theme (i.e. all spies) this is a well-balanced force. Verena and the Saboteurs hit hard up close, while Mak and Loku snipe from a distance. Everyone (except C-3PO) can benefit from command cards like Hide in Plain Sight and Slippery Target, making this strike-team exceptionally good on defence as well. The key is to keep mobile, and to get lots of use out of Leia's Battlefield Leadership ability.


Turn 1: Banthageddon

The game started off slow, with both parties tentatively sending out skirmishers through the halls of Kuat station, hoping to draw their opponents out. C-3PO ambled forward, oblivious to the Hired Guns fanning out around him. Meanwhile, the Rebels deployed their snipers into shadowy corners, hoping to wreak havoc next turn.


C-3PO takes point

The Mercenary's Nexu stalked into the med-bay along the South wall, hoping to catch an isolated Rebel.


Death in the glow of the Bacta Tanks

Only toward the end of the round did things begin to hot up. The Rebels opened their blast door. On each flank, their Saboteurs almost incinerated some Tuskan Raiders, but in both cases their attacks missed because of long range. 

...But that was only the beginning of the Rebel's woes. The Banthas were getting restless.


"What's behind this door?"

The first Bantha Rider (the green one) charged at Verena Talos and her team of Saboteurs in the Northwest corner. He stampeded and stomped one Saboteur into jelly, and left Verena mortally wounded. And then the second Bantha (the red one) surged out towards the centre of the station. Spurred by his Beast Tamer, he covered a tremendous distance, crashing into Leia and Mak and injuring both. Mak used Slippery Target to back away, but how to escape from such a big monster in such a small station?


A Bantha gores Princess Leia

Just as the 1st turn seemed about to end, things got even worse. I was lucky enough to draw both copies of Jundland Terror for my initial hand of Command Cards. This deadly card allows a Bantha to take a move and then perform an extra action/attack at the end of the round. Why not use them both, one on each Bantha? 


Threepio, Mak and Loku meet a hairy end

Thus Verena Talos was hit again -- but worst of all, the red Bantha now had a clear path to plow into C-3PO, Mak and Loku. Using his Stampede ability, he sat on all three heroes of the Rebellion, ignominiously killing them with his great shaggy buttocks.


Turn 2: That's No Way to Die

The second turn was over quickly. The Rebels, who now had initiative, tried to save Leia. She activated early, frying the Nexu and trying to back away to safety. But the red Bantha Rider, impelled by the Beast Tamer, gave chase, crushing Leia to death against a wall of the space station. After that, the rider still had the wherewithal to shoot and kill a surviving Mon Calamari Saboteur. Meanwhile, his mate, the green Bantha ran down Verena. 

Such an ugly end for two beautiful heroes.


Verena Talos fights to the bitter end

At this point, we called it. We've seen some one-sided games of Imperial Assault, but this was the worst. Besides losing the Nexu and one Tuskan Raider, the Mercenaries were almost unharmed and had access to 2 of the 3 relay stations. The Rebels, on the other hand, were Bantha Fodder.


Reflections

When I fielded two Bantha Riders, I had no idea they would be so deadly. They have great speed, a decent long-range attack and tonnes of staying power -- plus a devastating range of abilities in close combat. The narrow confines of the Kuat Station made this combination irresistible.  And all for only 9 points!

We are left with the question: what beats a Bantha Rider? Or worse, what beats 2 Bantha Riders? Darth Vader?  An AT-ST? A tribe of Wookie Warriors? I have a sense that Nicos and I will find out soon...


Friday, May 13, 2016

Jewish Characters in Fantasy: a follow-up


Thanks to everyone who left so many thoughtful comments about my post on Jewish characters in fantasy settings generally (and in Citadel miniatures in particular). Although this was a pretty obscure topic, to my surprise, it turned into one of the most popular posts I've ever written.

There's much to say as a follow-up, but I'm going to limit myself to three quick points.


First , one of the observations that several people made is that Jewish history, language and culture were inspirations for the Dwarves of Middle-earth. It's unclear how intentional this was at the time of writing, but Tolkien himself acknowledged the connection much later. As he said during a 1971 interview:
“I didn’t intend it, but when you’ve got these people on your hands, you’ve got to make them different, haven’t you? The dwarves of course are quite obviously, wouldn’t you say that in many ways they remind you of the Jews? Their words are Semitic, obviously, constructed to be Semitic."
One particularly important connection between Dwarves and Jews is the theme of exile. Medieval Jews were defined by their banishment from Israel. And when we encounter the Dwarves in The Hobbit, we also meet them as exiles. Nobles, warriors and great craftsmen are reduced to wandering like tinkers, singing mournfully about their lost home in the Lonely Mountain. But when we come into The Lord of the Rings, we understand that there is a much greater and more painful exile troubling the dwarves: the long banishment from Moria.

By seeing the connection between Dwarvish and Jewish history, we can better appreciate the motivations of a character like Gimli, and his keening for Moria. This connection is also important because it adds another layer of poignancy to the friendship of Gimli and Legolas. I sense in their reconciliation a hidden hope of Tolkien that centuries of strife and mistrust -- in both Europe and in Middle-earth -- can be amended in the wake of horrific war.


As K. Friedman says, they ain't making Jews like Jesus anymore.

The second thing that surprised me about the commentary on my post was that nobody mentioned the Land of Shem invented by Robert E. Howard in his Conan stories. Howard's Hyborean Age has many thinly veiled parallels with our ancient world, notably the association of the Shemites with the ancient Israelites. "Shem" is, after all, the son of Noah who was the legendary progenitor of the Hebrews, Assyrians and others. Howard himself wrote that his ancient Shemites would become our "Arabs, Israelites, and other straighter-featured Semites." (The Hyborean Age, 1936). Straight-featured Semites? Is that a thing?

In any case, Howard's portrayal of the Shemites flirts with well-worn stereotypes (hook noses, a love of money, dishonesty). However, Howard is capable of moving beyond caricature and supplying some memorable Shemish characters. The most important of these is Belit, Queen of the Black Coast: a pirate, a lover of Conan, a savior from beyond the grave, and a possessor of heaving bosoms:
She turned toward Conan, her bosom heaving, her eyes flashing...
She had looped the necklace about her neck, and on her naked white bosom the red clots glimmered darkly...
...he saw the blaze of her dark eyes, the thick cluster of her burnished hair; her bosom heaved, her red lips were parted...   (Queen of the Black Coast, 1934)
That'll put steel in your thews.


"Arnold - take this rock!" by Amelia Fink

Finally, I don't want to leave the topic of Jews in fantasy worlds without mentioning Hello from the Magic Tavern. This is a podcast that's broadcast from a tavern called "The Vermillion Minotaur" in the magical land of Foon. The podcast does an excellent job of poking fun at many of the conventions of high fantasy, including the customary absence of Jews.  If you haven't listened to Hello from the Magic Tavern, give yourself a treat and start at Episode #1. 

Or, you can fast forward to Episode #45 and listen to an interview with the First Jew of Foon. Just remember --- IT IS NOT REAL.